
I recently overcame one of my biggest fears. What was that fear, you ask? Being alone? Dying a slow, painful death? Sleeping with the closet doors open? Pie Crusts? Yes! That's right - pie crusts. Oddly enough I've harbored an intense, irrational fear of making pie crusts. 6 years ago I ventured into the art of baking and attempted a lattice crust apple pie for a 4th of July celebration. The pie ended up coming out decently enough. But the recipe I found online was so intricate and specific that I (temporarily) developed heart palpitations over being nervous about entirely screwing up that damn pie and (pseudo-permanently) developed a hatred toward making pie crusts. I vowed to never deal with them ever ever again! But of course, if you know me, you know that it would bother me so much that I failed at this seemingly simple venture that I would have to try again.... eventually....
And eventually came 6 years later in the form of "Cherish Teters to the rescue!" (and, yes, she does have a Super Woman cape, fyi). She's quite the pie expert, and I learned much from Obi-Wan-Teters on this star-crossed day where she helped me conquer my fear of pie crusts and make 60 pie pops (apple and pecan) for my sister's bridal shower and our personal consumption! These little treats are seriously bite-sized morsels of pure awesomeness. Just the perfect amount of pie to satisfy your palate. :)
Now I finally get what they mean by "as easy as pie."
Pie Crust Ingredients:
Yields 2 double-crusted pies (i.e. 4 crusts) = 40 pie pops (10 pie pops per crust)
4 cups flour
1 1/3 cup Crisco shortening*
2 t salt
2 t salt
3 or 4 T stick margarine
1/4 cup or less sugar**
12-13 T water
1. In bowl, add all ingredients except water
12-13 T water
1. In bowl, add all ingredients except water
2. Use pantry blender to mix together
3. Pour in about 12-13 tbsp cold water, and mix quickly
- if the dough appears too wet, add in a little more flour and mix
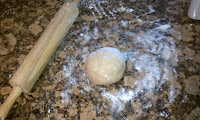
4. Separate dough into 4 sections
5. Take one section and roll out on floured surface to 1/8" thickness
*I tried with all my might but couldn't find a healthier substitute for Crisco without sacrificing that delicious flaky crust. Sometimes ya just gotta deal.
**I replaced granulated sugar (GS) with Turbinado. It's a healthier alternative - less processed so it retains more of its minerals. Turbinado is formed as larger crystals and has a more molasses-y taste than GS, but once baked you can't even tell the difference! Also, GS and non-raw brown sugar (which is merely GS w/ molasses added back in for color) may both be processed through bone char (cow bones) to whiten and decolorize it, making them questionably non-vegan.
Filling Ingredients:
Note: When making the pie pops, I made WAY more filling than necessary. So this is my approximation of how much filling you should make for 20 pie pops for each type of filling. I apologize if the measurements are off. Further, I adopted the pecan filling recipe from a pecan tart (not pie) recipe, but feel free to look up your own pecan or apple filling recipe and incorporate.
Apple Pie Filling:
Apple Pie Filling:

4 cups sliced, peeled baking apples (about 1.5lbs) (I used Granny Smith)
1 T lemon juice
1/2 cup Turbinado (or 3/8 cup white sugar, 1/8 cup brown sugar)
1/8 cup flour
1/2 t cinnamon
1/8 t nutmeg
Mix all ingredients together, set aside.
Pecan Pie Filling:

1 cup pecans
1/4 cup Turbinado (or white sugar)
1/4 cup light corn syrup**
2 eggs
1 t vanilla
Mix all ingredients together, set aside.
**I substituted corn syrup with agave nectar. Agave offers more health benefits, and can be used as a substitute for other common sweeteners as well. To substitute for corn syrup, I used 1/2 the amount listed and added 1/3 amount of the other liquid - so 1/8 cup agave + 1/12 cup water.
Pie Pop Assembly Instructions:
From Bakerella
Preheat oven to 375*
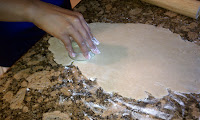
 1. Roll out dough on floured surface to 1/8" thickness
- The convenient part about pie pops is that you don't need to roll your pie crusts into perfect circles, since you'll be cutting out circles anyway!
2. Lightly dust with a little bit of flour on bot sides - it'll make the dough easier to work with and move around.
3. Use a cookie cutter and cut out your circles
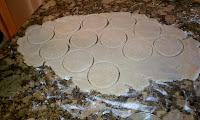 4. Save the dough scraps, roll flat and re-use to cut out more circles
5. Place one layer of circles on a baking sheet
6. Place lollipop sticks on circles, about halfway up (or a little higher if you prefer), and press down to secure.

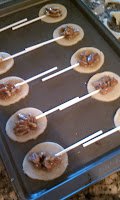 7. Place filling in the center of each circle. If you put too much, the filling will seep out of the pies.
8. Place second set of circles on top, and press around edges to seal. Make sure to press around the lollipop stick to secure.
9. Use an extra lollipop stick to press around the border for that pretty dowel-edged look.
10. Brush egg whites onto top of crust before baking. ( Another option is to brush with a mixture of 1 egg yolk + 1T milk)

11. Bake at 375* for 12-15 minutes or until the tops start to brown.
Remove, cool and enjoy!!!
Preheat oven to 375*
 1. Roll out dough on floured surface to 1/8" thickness
- The convenient part about pie pops is that you don't need to roll your pie crusts into perfect circles, since you'll be cutting out circles anyway!
2. Lightly dust with a little bit of flour on bot sides - it'll make the dough easier to work with and move around.

3. Use a cookie cutter and cut out your circles
 4. Save the dough scraps, roll flat and re-use to cut out more circles
5. Place one layer of circles on a baking sheet
6. Place lollipop sticks on circles, about halfway up (or a little higher if you prefer), and press down to secure.

 7. Place filling in the center of each circle. If you put too much, the filling will seep out of the pies.
8. Place second set of circles on top, and press around edges to seal. Make sure to press around the lollipop stick to secure.
9. Use an extra lollipop stick to press around the border for that pretty dowel-edged look.
10. Brush egg whites onto top of crust before baking. ( Another option is to brush with a mixture of 1 egg yolk + 1T milk)

11. Bake at 375* for 12-15 minutes or until the tops start to brown.
Remove, cool and enjoy!!!
Optional Shortcuts:
1. Use pre-made pie crusts
2. Use canned pie filling
- I never really knew these existed until Cherish mentioned it! I guess I used canned pumpkin before for pumpkin pie, but didn't put together the fact they sell various canned pie fillings!

1. Other shapes can be used, like hearts, but circles give the most room in the center for filling.
2. You can also create these mini pies without the sticks - leaving you with personal-sized pies of any shape. That way you may be able to fit a little more filling in the center. You could arrange it on a pretty platter, present them in a basstack them in a vase for display!

No comments:
Post a Comment